Interactive Growing Guide

We've gathered everything you need to start growing and eating homegrown.

Now that you're here, this Interactive Growing Guide is your space to learn, plan, and grow. Inside, you'll find everything you need, from choosing what to grow and creating healthy soil to understanding timing and using simple templates to bring your garden to life.

Table of Contents

What to plant Planting & Companions
☉ Chosing what to Grow
☉ Table of Planting
☉ Companion Planting
☉ Lunchbox Ideas 
Preparing your garden Prepare The Garden
☉ How to choose the right spot
☉ Preparing the soil
☉ Raised Beds or Traditional Growing?
Soil health Creating Living Soil

☉ Soil Biology 101
☉ Soil Bio-Diversity
☉ Composting 101
☉ Soil Health Check
Timing and moon Planting with the Moon

☉ Why Plant with the Moon?
☉ Moon Phases & Gardening
☉ Lunar Planting Routine
Garden plan Example Plan & Templates
☉ Example Garden Plan
☉ Downloadable Templates
Troubleshooting Troubleshooting & FAQs
☉ Why are my seeds not sprouting?
☉ Why are my seedlings Leggy or Yellow?
☉ What are the brown spots on my leaves?
☉ How do I manage Pests & Weeds?
Planning icon

Planting & Companions

Spring is the ideal time to begin your garden! With the days getting longer, the weather warming, and the soil full of life, it’s the start of a fresh growing season. In this section, we’ll cover how to choose crops you’ll really enjoy eating, a table of spring crops, quick planting tips, and the basics of growing common vegetables.

1. Choose What You Actually Eat

The most successful gardens are the ones that focus on growing what you’ll actually eat:

  • Go into your kitchen and write down all of the fruit, vegetables and herbs your family regularly eats - like potatoes, broccoli, rosemary, oranges, apples, etc.
  • Break the list down into what can be grown in this season, and you’ll have the perfect starting point for your first garden (see table below of some spring crops).
  • Grow simple herbs such as basil, parsley, rosemary, and thyme for fresh use and have the garden close to your kitchen (that way you will actually use them).
  • Add staples like potatoes, kūmara, and pumpkin as they are easy to grow, fill out meals, and store well.
  • Include a flower like marigold or borage to support bees, butterflies, and other helpful insects. This means your crops will get pollinated which means your plants will bear more fruit and vegetables.
Tip: Start your first garden small and keep it close to the kitchen. A smaller space is easier to manage and helps you avoid feeling overwhelmed, while having it nearby makes it more likely you will use your fresh harvests. Remember: if it is out of sight, it is easy to forget, but when it is right in view it stays top of mind and you will naturally check on it more often.

Spring Crops for Beginners

Below you'll find beginner-friendly spring crops with how-to notes. The table includes plant type, planting tips, days to harvest, spacing, and useful companions so you can plan confidently and avoid common mistakes.

Plant Type Planting Tips Days to Harvest Spacing Companion Plants/Tips
Potato Root Plant seed potatoes in well-drained soil, mound soil as they grow 90–120 30–40cm apart Beans, corn, cabbage, marigolds (repel pests)
Kūmara Root Plant slips in warm soil, full sun, space well apart 100–120 30–50cm apart Corn (shade & support), beans (fix nitrogen)
Spinach Leaf Sow every 2–3 weeks for continuous harvest 30–40 15–20cm apart Strawberries, onions, peas (space-efficient, pest control)
Spring Onions Bulb Sow shallowly or transplant seedlings 50–60 10–15cm apart Carrots, lettuce, spinach (repels some pests)
Zucchini Fruit Needs space, plant after frost, full sun 50–70 80–100cm apart Nasturtiums (repel aphids), corn (partial shade & structure)
Tomato Fruit Start from seedlings, plant in full sun 60–90 50–60cm apart Basil (improves flavour & growth, deters pests), marigold (pest deterrent)
Corn Grain/Vegetable Sow in blocks for pollination, full sun 70–90 25–30cm apart Beans (fix nitrogen), squash (ground cover) – classic “Three Sisters”
Pumpkin Fruit Needs lots of space, sow after frost 90–120 100–120cm apart Corn & beans (Three Sisters), nasturtiums (repel pests)
Strawberry Fruit Plant dormant runners or seedlings 60–90 25–30cm apart Spinach, lettuce, borage (attract pollinators)
Chilli Fruit Start from seedlings, warm soil, full sun 70–90 40–50cm apart Basil (repels aphids), marigold (pest deterrent)

Quick Planting Tips:

  • Seeds should be planted at a depth no more than twice their size (if the soil is too wet, the seed will rot; too dry and they won’t germinate).
  • Store bought seedlings should have their roots gently loosened before planting and be pressed lightly into the soil to remove air pockets.
  • Water gently after planting – for higher success, you can add seaweed fertilizer.
  • Label plants so you know what’s growing where (trust me, you will forget otherwise).
  • Warm-season crops like tomato, corn, pumpkin, zucchini, strawberry, chilli, and kūmara should be planted after the last frost (usually late October in the Bay of Plenty).

Companion Planting Tips for Beginners:

  • Tomato + Basil: Basil can improve tomato growth and flavour and help deter pests.
  • Potatoes + Marigolds: Marigolds help repel nematodes and some potato pests.
  • Corn + Beans + Pumpkin: The classic "Three Sisters" combination: corn provides structure, beans fix nitrogen, and pumpkin shades soil to retain moisture.
  • Zucchini + Nasturtiums: Nasturtiums attract aphids away from zucchini.
  • Spinach & Onions: Plant together to make the most of space and help deter pests.

Kid‑Friendly Quick Greens & Lunchbox Ideas

Fast, mild greens keep tamariki engaged and make it easy to add homegrown goodness to lunches. These crops grow quickly, taste great when picked young, and fit naturally into family meals.

  • Rocket (arugula)
    • Gentle peppery kick when picked young → expands taste range without being “spicy.”
    • Contains vitamin K and plant compounds that add flavour without sauces.
    • Fast to mature (wins patience battles); great for taste‑test games (mix 50/50 with lettuce).
    • Lunchbox: cheese + rocket pinwheels; mix into salads for a tiny zing.
  • Cucumber
    • Crisp texture, refreshing flavour → perfect for salads, wraps, or dipping.
    • Rich in hydration and vitamin K; gentle crunch makes it fun for kids to eat.
    • Fast-growing and rewarding - a great way to keep the “we grew this!” excitement alive.
    • Lunchbox: sliced into sticks with hummus or tucked into sandwiches.
  • Spinach (baby)
    • Small leaves = mild compared to mature spinach.
    • Offers folate, vitamin K, and iron (non‑heme) – nice variety in a week’s greens.
    • Season lesson: grows best cool; swap to NZ spinach in heat (great teachable moment).
    • Lunchbox: mini frittata muffins; blend into pesto for a stealthy nutrient bump.
  • Pea shoots
    • Sweet, pea‑like flavour kids actually enjoy.
    • Very fast (10–16 days) → instant gratification.
    • Contains vitamin C, A, and a little protein for a leafy green.
    • Indoor tray = year‑round science project (light, water, growth tracking).
    • Lunchbox: pea‑shoot pesto or simple snips in wraps.
    • Allergy note: peas are legumes – skip if there’s a pea/legume allergy.
  • Microgreens (sunflower, radish, broccoli, coriander, etc.)
    • 7–12 days to harvest keeps tamariki engaged.
    • Big flavour in tiny leaves; sprinkle amounts still “count.”
    • Many varieties provide vitamins A/C/K and diverse phytonutrients (varies by seed).
    • Windowsill‑friendly — no garden needed; great for daily “spritz & measure” routines.
    • Lunchbox: on cream‑cheese bagels, sushi bowls, salads.
Now that you've chosen what to grow, let's make sure your garden space is ready. Up next: Preparing Your Garden - a simple guide to setting up the perfect spot for a healthy garden.
Potted Plant

Prepare The Garden

Getting your garden space ready is the foundation for a healthy, productive spring garden. A little planning and preparation now saves time and frustration later.

1. Choosing the Right Spot

  • Sunlight: Most veggies and herbs need 6 to 8 hours of direct sunlight daily. North-facing spots in NZ are best.
  • Shelter: Pick a space sheltered from strong winds but with good airflow.
  • Access to Water: Being near a tap or water source makes life much easier.
  • Raised bed, or planting in the ground? See 3. for information.

2. Preparing the Soil

"We aren't what we eat, we are what we eat, eats"

  • Clear the Area: Remove weeds, grass, & old plants.
  • Loosen the Soil: Use a garden fork to break up compacted soil (Loosen, don't turn)
  • Add Organic Matter: Mix in compost, worm castings, or well-rotted manure for nutrients.
  • Check Drainage: If water pools after rain, raise the bed or add organic matter to improve drainage.

3. Raised Beds or In-Ground?

Each option has pros and cons. Choose what suits your space, time, and budget.

Raised BedsRaised Beds

  • Great for good drainage and easy access
  • Warm up faster in spring
  • Good option if you're restricted by mobility
  • Initial setup cost but lasts years

WorldIn-Ground Beds

  • Cheapest option - use what you have
  • Great for larger gardens or root crops
  • Regenerates the soil biology and offers more nutrient density
  • Allows you to use all areas of your garden for growing

4. Extra Tips Before Planting

  • Test soil pH if possible (most veggies prefer a neutral 7.0pH)
  • Mulch paths and edges to reduce weeds and less birds digging
  • Plan crop rotation (don't plant the same family in the same spot year after year)
  • Sketch a rough garden layout (spacing diagram helps!)
Once your garden space is prepared, you're ready for Soil Health Basics (next page), where we'll dive deeper into creating living, nutrient-rich soil.
World icon

Creating Living Soil

Nutritious produce begins with healthy, living soil.

Soil Biology 101

“We aren’t what we eat, we are what we eat eats.” Feed soil life first and plants will follow. Compost and organic matter fuel beneficial microbes; in turn, microbes convert that into plant-available nutrients. Earthworms aerate and mix, fungal networks move water and minerals, and good structure holds moisture while still draining.

  • Loosen, don’t turn: Preserve soil layers and the communities living there.
  • Aeration & drainage: Compacted soil suffocates roots and can cause rot – improve structure with compost and avoid overworking wet soil.
  • Mulch & Cover Crops: Protect soil from drying out and erosion, and keep feeding microbes year-round.
  • Worm Farms: A small worm bin provides steady "worm tea" for your garden.

1. Soil Bio-Diversity

  • Organic Matter is Key: Add compost, worm castings, or well-rotted manure before planting.
  • Soil Life: Beneficial fungi, bacteria, and insects break down organic matter into nutrients plants can actually use.
  • Structure: A healthy soil is crumbly, holds moisture, but also drains well.
  • Avoid using chemical fertilisers & sprays: They destroy soil life.
  • Diversity is key: Biological diversity above the ground encourages biological diversity below the ground – creating more nutrients for the plants to absorb.

2. Composting 101

Compost is your garden's best food.

  • Balance: Aim for a mix of "greens" (food scraps, grass clippings) and "browns" (leaves, straw, cardboard).
  • Moisture: Keep it damp, like a wrung-out sponge.
  • Airflow: Turn your compost every few weeks to add oxygen.
  • Result: In 2–3 months you'll have dark, sweet-smelling compost to add back into your garden.

3. Natural Ammendments

  • Seaweed (liquid or dried): Adds trace minerals and boosts plant immunity.
  • Lime: Replenishes minerals & balances pH.
  • Comfrey or Nettle Tea: Natural liquid fertilizer for strong leafy growth.
  • Mulch: A layer of straw, leaves, or wood chips helps keep soil cool, moist, and full of life.

5. Soil Health Check

  • Squeeze some soil gently in your hand to create a sausage shape, it should hold its shape without crumbling apart or being too soggy 
  • Soil should dark, hold together and crumbly, not pale or compacted
  • WormEarthworms are present (a good sign of life!)
With living soil beneath your feet, you're ready for the next step: Seasonal Planting, where we'll match your crops to the right conditions for Bay of Plenty's spring season.
Planting icon

Seasonal Planting

Getting the timing right makes all the difference in your garden. Some crops thrive when the soil is warm, while others can be planted earlier in cooler conditions. This page will guide you through sowing, transplanting, and caring for your spring crops.

1. Sowing Seeds vs. Seedlings

Practical planting starts with choosing whether to sow directly or transplant seedlings. Direct sowing suits quick-sprouting, hardy crops and saves time; seedlings let you get a head start on warmth-loving plants and ensure strong starts before outdoor conditions are right.

  • Direct Sow (into soil): Corn, pumpkin, zucchini, beans, carrots, potatoes, kūmara.
  • Raise Seedlings (indoors or in trays): Tomatoes, chillies, capsicum, basil, lettuces.
  • Transplanting: Move seedlings into the garden once the last frost has passed and the soil is warm.

2. Spacing & Depth Basics

Good spacing and correct depth set your plants up for success. Crowding stresses plants and invites pests; correct depth helps seeds germinate reliably and roots establish well.

  • Small seeds (carrots, spinach, spring onion) → shallow sowing (0.5–1cm).
  • Larger seeds (corn, pumpkin, beans) → deeper sowing (2–5cm).
  • Follow the spacing guide (see previous page), giving each plant enough room to breathe.

Why planting depth matters

  • Too deep and seeds struggle to reach light before energy is spent; too shallow and they dry out or wash away.
  • Moist, warm soil is key – if soil is waterlogged seeds rot; if too dry they won’t germinate.

3. Watering Tips

Water deeply and consistently to build resilient plants. Aim to water the soil, not the leaves, and use mulch to lock in moisture and suppress weeds.

  • Water seedlings gently so you don't wash them away.
  • Morning watering is best - plants drink during the day.
  • Deep, less frequent watering is better than shallow daily sprinkles.
  • Mulch helps keep soil moist and reduces weeds.

Signs of Readiness (Transplanting)

  • Seedlings have 2–3 true leaves and look sturdy.
  • Soil is consistently warm and workable; no frost forecast.
  • Seedlings are hardened off: gradually acclimated outdoors over 7–10 days.

4. Seasonal Planting Guide – Bay of Plenty (Spring)

Crop Start Indoors (Seedlings) Direct Sow Outdoors Plant Out (Seedlings) Notes
Tomato Aug–Sep Oct–Nov Loves warmth, stake plants
Chilli Aug–Sep Nov Needs long season & heat
Zucchini Oct–Nov Oct–Nov Fast grower, plenty of space
Corn Oct–Dec Plant in blocks for pollination
Pumpkin Oct–Nov Give lots of room
Potato Sep–Nov Plant seed potatoes, mound soil
Kūmara Nov–Dec Plant slips in warm soil
Spinach Sep–Nov Sow every 2–3 weeks
Spring Onion Sep–Nov Great interplant crop
Strawberry Aug–Oct Plant runners/seedlings

5. Timing Tips

  • Don't rush - warm-loving plants like tomatoes, chillies, and pumpkins will sulk in cold soil.
  • Succession planting (sowing every 2–3 weeks) keeps your garden producing continuously.
  • Mix crops: pair fast-growers (spinach, spring onion) with slower crops (corn, tomatoes) to maximize space.
Next up: Companion Planting & Pollinators — discover how to make your garden healthier and more productive by planting friends together.

Looking Ahead

Plan beyond spring to keep harvests coming and your soil improving over time.

Crop Rotation & Bed Mapping

  • Rotate plant families (e.g., brassicas, legumes, roots, fruiting) to reduce disease and balance nutrients.
  • Note where each crop grows this season and plan a new spot next season.

Soil Regeneration

  • Use cover crops or green manures in off‑periods; add compost and mulch between crops.
  • Aim for continuous cover – living roots feed microbes year‑round.

Seasonal Checklist

  • Summer: Deep watering, mulch top‑ups, pest scouting, harvest often.
  • Autumn: Clear spent crops, add compost, plan cool‑season sowings or seed saving.
Pollinator icon

Pollinator Plants

A thriving garden isn't just about vegetables - it's about balance. By planting flowers and herbs that attract pollinators and beneficial insects, you'll boost harvests and keep pests under control naturally.

1. Why Do Pollinators Matter?

  • Bees carry pollen between flowers, helping crops like tomatoes, pumpkins, strawberries, and zucchini bear fruit.
  • Butterflies & moths bring beauty while aiding pollination.
  • Ladybugs feast on aphids and soft-bodied pests.
  • Hoverflies & lacewings control pests like whitefly and caterpillars.

2. Best Plants to Attract Beneficial Insects

  • For Bees & Butterflies: Lavender, borage (bee magnet), sunflowers, nasturtium, echinacea, calendula, Pineapple sage (winter blooms).
  • For Ladybugs & Lacewings: Dill, fennel, coriander, yarrow, alyssum (attracts hoverflies), cosmos.
  • Dual Benefits (flowers + edible/medicinal use): Basil, thyme, oregano, chamomile.

Why these help

  • Borage brings pollinators to fruiting crops like tomatoes and squash.
  • Alyssum attracts hoverflies whose larvae feed on aphids.
  • Marigolds can help reduce pest pressure near potatoes and tomatoes.
  • Basil pairs with tomatoes — supports growth and draws bees to blossoms.

3. Planting Strategies

Blend flowers and herbs throughout your beds to attract pollinators and beneficial insects all year. This creates a balanced ecosystem that reduces pests and boosts harvests.

  • Mix flowers with crops - plant marigolds near tomatoes or basil near chillies.
  • Winter bloomers matter - plants like Pineapple sage flower in winter, giving bees enough nectar to survive the cold season.
  • Layer your garden - tall sunflowers, mid-height herbs, and low-growing alyssum create habitats for different insects.
  • Avoid chemical sprays - pesticides harm pollinators and disrupt natural balance.

4. Companion Pollinator Boosters

  • Tomato + Basil - improves growth, keeps away pests, attracts bees.
  • Corn + Sunflowers - draw in bees for better pollination.
  • Cucumber + Nasturtium - nasturtium lures aphids away, flowers attract pollinators.
  • Pumpkin + Borage - borage flowers attract bees that love pumpkin blossoms.

5. Quick Tip for Balance

A simple rule: For every 3–4 vegetable crops, add at least 1–2 flowering plants. This creates balance, beauty, and natural pest control.
Moon icon

Planting with the Moon

For centuries, gardeners and farmers have followed the rhythms of the moon to guide planting and harvesting. The moon's gravitational pull affects tides, water, and even the moisture in soil - meaning plants respond to these cycles too. Planting by the moon can help your garden grow stronger and more naturally balanced.

1. Why Plant with the Moon?

  • Full moonThe moon influences soil moisture – just like tides, it gently pulls water upward in the soil profile.
  • Seeds absorb more water during certain phases, leading to stronger germination.
  • Following lunar cycles creates a simple rhythm for planting, pruning, and harvesting.

2. Moon Phases & Gardening

New Moon

New Moon (Waxing Crescent)

  • Energy is rising, moisture is pulled upwards.
  • Best for leafy greens & above-ground crops (spinach, lettuce, herbs, cabbage).
  • Sow seeds that sprout quickly.
First Quarter Moon

First Quarter (Waxing Half Moon)

  • Growth and strength increase.
  • Best for fruiting & vining crops (tomatoes, beans, corn, zucchini, pumpkin).
  • Transplant seedlings now for a strong establishment.
Full Moon

Full Moon (Waning Gibbous)

  • Moonlight is strongest, moisture is high.
  • Best for root crops (carrots, potatoes, kūmara, beetroot).
  • Also a great time for fertilising, pruning, and harvesting.
Last Quarter Moon

Last Quarter (Waning Half Moon)

  • Energy draws downward into roots.
  • Best for maintenance: weeding, mulching, composting, pest control.
  • Avoid planting now; focus on soil work.

3. Lunar Planting Routine

  • New Moon – Sow leafy greens (spinach, lettuce, herbs) as rising moisture supports quick germination.
  • First Quarter – Plant/transplant fruiting crops (tomatoes, beans, corn, zucchini) for strong top growth.
  • Full Moon – Direct‑sow or plant root crops (carrots, potatoes, kūmara, beetroot) when soil moisture peaks.
  • Last Quarter – Pause planting; weed, mulch, feed, and tidy beds to prepare for the next cycle.

4. Quick Tips

  • Keep a simple calendar and mark the moon phases.
  • Even if you miss a phase, don't stress - use it as a guide, not a rulebook.
  • Combine lunar planting with seasonal timing (e.g., don't sow corn in winter just because it's the right moon phase).
PotatoNext up: Example Garden Plan & Templates – see how to put it all together in a beginner-friendly layout.
Garden plan icon

Example Garden Plan & Printable Templates

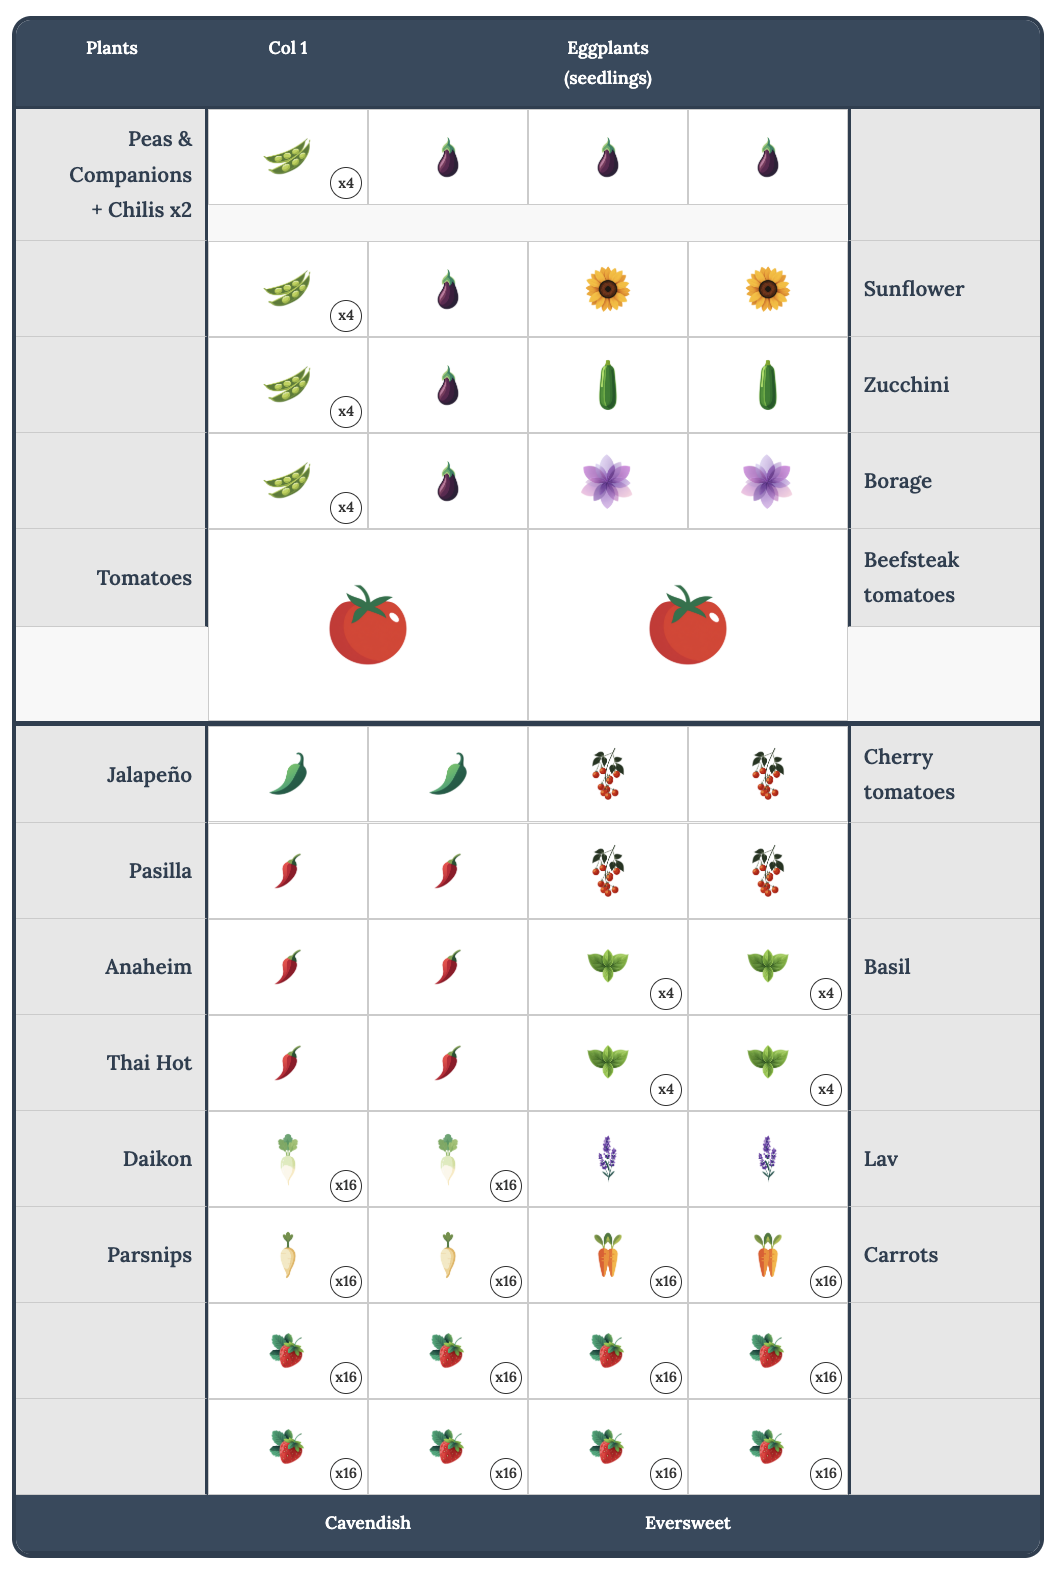
Below are example garden layouts showing proper plant spacing. Each plant needs different space - for example, zucchini requires 60-80cm while beans need just 15cm. Download our printable 30cm grid template to plan your own garden.

Eggplant Download Printable Garden Planner (PDF)

Use this simple 30cm grid template to plan your garden. Each square represents 30cm which is the average space needed for most vegetables. Includes a notes area to sketch your layout.

Download Printable Planner (PDF)

Example Garden Layout with Proper Spacing

Garden Planting Chart

Fence (3 meters away)

N ↑ E → S ↓ W ←
Spring garden layout showing peas, tomatoes, herbs, and strawberries spaced within a 3 meter bed.
x# = Plant count
Peas = Peas
Eggplant = Eggplants
Tomato = Tomatoes
Jalapeño = Jalapeño
Zucchini = Zucchini
Basil = Basil
Strawberry = Strawberries

Key Design Principles:

  • Companion Planting: Tomatoes with basil, peas with eggplants for nitrogen fixing, herbs with capsicum/chillies for pest control
  • Height Variation: Tall plants (sunflowers) positioned to avoid shading smaller crops
  • Proper Spacing: Each square represents 30cm - adequate space for plant development and root systems
  • Plant Density: Numbers shown (x4, x16) indicate how many plants fit per 30cm square for optimal growth
  • Succession Planting: Peas can be followed by warm-season crops after harvest
  • Multi-story Gardening: Larger plants (tomatoes) use 2x2 squares for proper root space and support
  • Pest Management: Strategic placement of aromatic herbs and flowers to deter pests naturally
  • Soil Health: Mix of nitrogen-fixing legumes with heavy feeders for balanced soil nutrition
Troubleshooting

Troubleshooting & FAQs

Why are my seeds not sprouting?

  • Depth: Plant no deeper than twice seed size.
  • Moisture: Too wet → rot; too dry → no germination.
  • Temperature: Cold soil slows or prevents sprouting – wait for consistent warmth.
  • Seed quality: Old or poorly stored seed may have low viability.

Why are my plants leggy or yellow?

  • Light: Not enough light leads to long, weak stems – provide brighter light.
  • Cold or shock: Chilly nights or sudden changes can stress plants.
  • Fertility: Use gentle, balanced feeding; avoid over‑fertilising young plants.

What are the brown spots on my leaves?

  • Tiny round spot with yellow halo is usually fungal
  • Irregular, greasy, watersoaked patches are usually bacterial
  • Crispy sun patches - usually sunburn
  • Holes with trails or brown edges are usually insect damage
  • Even discolouration could be nutrient deficiency

How do I manage Pests and Weeds?

  • Companions & flowers: Attract beneficial insects (borage, alyssum, dill).
  • Barriers: Use nets, collars, or row covers to protect seedlings. Plants like comfrey can be used along fencelines
  • Hand pick pests: Putting a headlamp on at night time and venturing off for a snail hunt can be very rewarding
  • Mulch to suppress weeds: Apply arborist mulch, pea straw, wood chip or compost to block light and suppress weeds

Ready to Start Your Spring Garden?

Download the complete PDF guide with all templates and keep it handy as you grow.

DownloadDownload Full PDF Guide

© 2024 Let's Grow Home • Aotearoa New Zealand

Start small, Grow tall Leaf

HomeProductsContact